A custom domain for your Minecraft server replaces the default IP address with a memorable, professional address (e.g., play.yourserver.com instead of 123.45.67.89:25565). This guide provides comprehensive instructions for setting up custom domains using different hosting providers and methods.
Benefits of a Custom Domain:
- Professional appearance for your server
- Easier for players to remember your address
- Ability to create subdomains for different server modes
- Improved branding and recognition
Why Use a Custom Domain?
Using a custom domain for your Minecraft server offers significant advantages over using a raw IP address. Here's why it's worth the effort:
Key Benefits:
- Memorability: Players can easily remember play.creativecraft.com compared to a numeric IP address.
- Professionalism: A custom domain makes your server appear more established and trustworthy.
- Flexibility: Change your server's hosting provider without players needing to update their server list.
- Subdomains: Create different addresses for different game modes (e.g., survival.yourserver.com, pvp.yourserver.com).
- Port Hiding: Players don't need to remember or enter a port number.
Option 1: Manual Setup with Dynu.com
Dynu.com offers free dynamic DNS services that allow you to create a custom domain for your Minecraft server. This method is ideal for server owners who want a cost-effective solution with full control over their DNS settings.
You'll see two options for creating your hostname:
Option 1: Use Our Domain Name
Choose this option if you don't own a domain name. Dynu provides free subdomains under their domains like accesscam.org.
Option 2: Use Your Domain Name
Choose this option if you already own a domain name and want to use it with Dynu's DNS services.
Option 1: Using Dynu's Domain
Select "Use Our Domain Name"
Enter your desired hostname in the "Host" field (e.g., myserver)
Select a top-level domain from the dropdown (e.g., accesscam.org)
Your full domain will be myserver.accesscam.org
Click "Add" to create your domain
Option 2: Using Your Own Domain
Select "Use Your Domain Name"
Enter your domain name in the "Domain Name" field (e.g., mydomain.com)
Click "Add" to create your domain
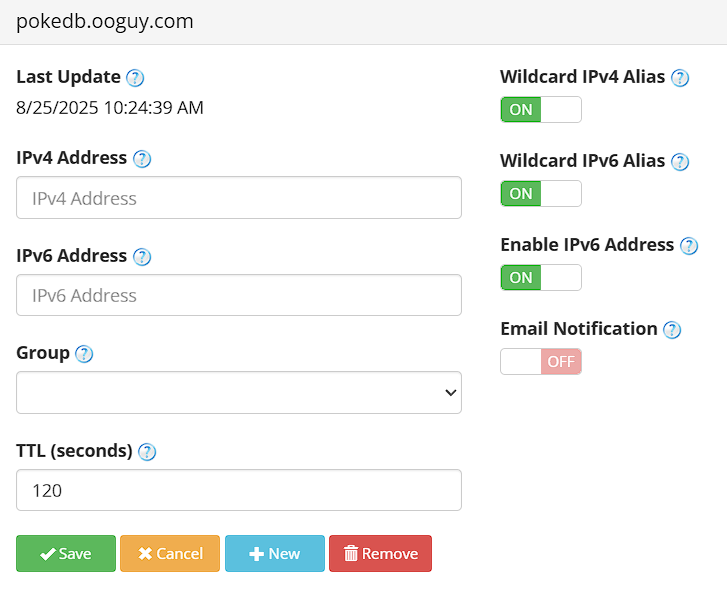
Configuring IP Address Settings
After adding your domain, you'll be taken to the IP configuration page
Important: Remove the IP address in the IPv4 address field and leave it blank
Click "Save" to save your changes
Leaving the IP address blank allows us to create custom A records later, which is essential for proper Minecraft server configuration.
Creating A Records
Now you'll create an A record to point your domain to your server's IP address:
If Using Eternal Hosting:
Use one of the following numerical IP addresses based on your server location:
Canada Server: 51.79.96.45
Finland Server: 37.27.49.121
In the Dynu Control Panel, navigate to "DNS" for your domain
Click "Add" to create a new record
Select "A" as the record type
Leave the "Host" field empty or enter "@" for the root domain
Enter the appropriate Eternal Hosting IP address in the "Points to" field
Set TTL to 60 (or leave default)
Click "Save"
If Using Other Hosting Providers:
Find your server's numerical IP address using DNS Lookup
In the Dynu Control Panel, navigate to "DNS" for your domain
Click "Add" to create a new record
Select "A" as the record type
Leave the "Host" field empty or enter "@" for the root domain
Enter your server's numerical IP address in the "Points to" field
Set TTL to 60 (or leave default)
Click "Save"
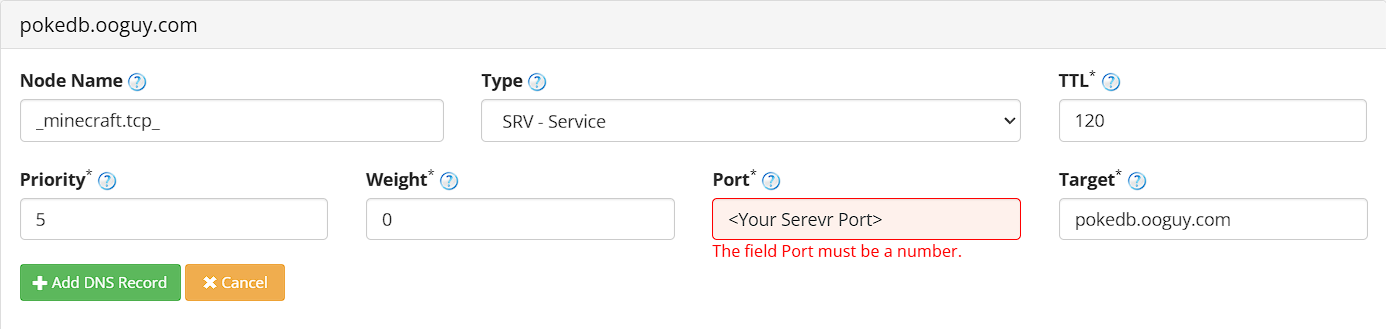
Creating SRV Records
SRV records allow players to connect to your server without specifying a port number:
In the Dynu Control Panel, navigate to "DNS" for your domain
Click "Add" to create a new record
Select "SRV" as the record type
Enter the following values:
Node Name:_minecraft.tcp_
Port: Your Minecraft server port (default is 25565)
Weight:5
Priority:0
TTL:120
Target: Your domain name (e.g., myserver.accesscam.org)
Click "Save"
Example of an SRV record configuration form. Fill in the fields as described above.
The SRV record tells Minecraft clients which port to connect to when they use your domain name, so players don't need to specify the port manually.
Connecting to Your Minecraft Server
Players can now connect to your server using your custom domain:
myserver.accesscam.org
Or if using your own domain:
mydomain.com
DNS changes may take up to 24 hours to propagate, but typically take only a few minutes. Test your domain by attempting to connect to it yourself before sharing it with players.
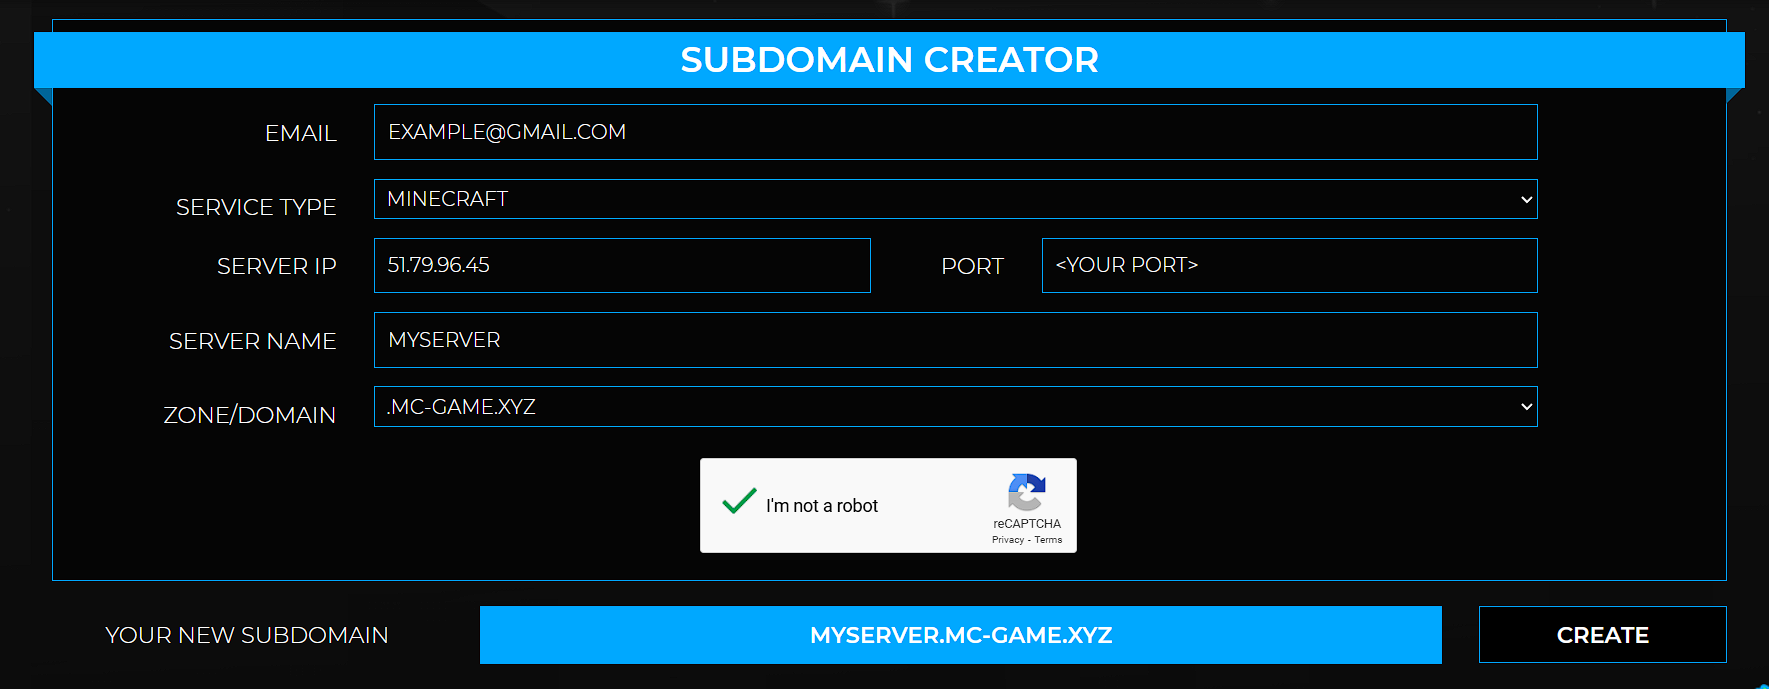
Option 2: Automatic Setup with Shockbyte
Shockbyte offers a simple subdomain creator that allows you to quickly set up a custom domain for your Minecraft server. This method is ideal for server owners who want an easy, no-cost solution.
Email: Enter your email address (e.g., example@gmail.com)
Service Type: Select Minecraft from the dropdown
Server IP: Enter your server's numerical IP address:
For Eternal Hosting:
• Canada Server: 51.79.96.45
• Finland Server: 37.27.49.121
For Other Hosting Providers:
Use DNS Lookup to find your server's numerical IP address.
Port: Enter your server's port (default: 25565)
Server Name: Enter your desired server name (e.g., myserver)
Zone/Domain: Select any available domain from the dropdown (e.g., .mc-game.xyz)
Your new subdomain will be displayed as myserver.mc-srv.com
Complete the CAPTCHA: Solve the CAPTCHA challenge to verify you're not a robot
Click the Create button to finalize your subdomain
Example of an Shockbyte configuration. Fill in the fields as described above.
The subdomain creator will automatically configure all necessary DNS records for your Minecraft server, including SRV records for port forwarding.
Available Domain Options
The dropdown menu in the Zone/Domain field includes several domain options you can choose from, such as:
.minecraft-server.pro
.mc-game.xyz, etc
Simply select the domain you prefer from the dropdown menu. For example, if you choose .mc-game.xyz and enter myserver as your server name, your final subdomain will be myserver.mc-game.xyz/code>.
Connecting to Your Minecraft Server
Players can now connect to your server using your new subdomain:
myserver.mc-game.xyz
Shockbyte automatically handles port forwarding, so players don't need to specify the port number. The subdomain should be active immediately after creation.
Option 3: Other Hosting Providers
In addition to Dynu.com and Shockbyte, you can also use other hosting providers like Elixernode for setting up custom domains for your Minecraft server. The process for Elixernode is similar to Shockbyte's subdomain creator, where you can easily configure a custom domain through their control panel.
Elixernode:
If you choose to use Elixernode, the setup process is very similar to Shockbyte's method. You'll need to create an account, select your server, and use their domain management tools to set up your custom domain. The general steps involve entering your server details and selecting a domain or subdomain option provided by Elixernode.
General Process for Most Hosting Providers
Most Minecraft hosting providers offer similar domain setup processes:
Create an account with the hosting provider
Select or set up your Minecraft server
Navigate to the domain or DNS management section
Enter your desired domain name or select from available subdomains
Configure any necessary DNS records (usually handled automatically)
Save your changes and wait for propagation
While the specific interface may vary between providers, the fundamental steps remain consistent across most Minecraft hosting services.
Each provider has its own strengths, so choose the one that best fits your specific needs and budget.
Troubleshooting Common Issues
Domain not resolving: Check your DNS records and ensure they're correctly configured. Use tools like DNS Lookup to verify your records.
Connection timeout: Ensure your server is running and that you've correctly set up port forwarding on your router (if hosting from home).
SRV record not working: Double-check that your SRV record is correctly formatted and that your A record is pointing to the right IP address.
Domain works with IP but not domain: This is usually a DNS issue. Wait 24-48 hours for DNS propagation and check your records again.
SSL/HTTPS errors: These don't affect Minecraft connections, as Minecraft doesn't use HTTPS for server connections.
If you're still having issues, check your server console for error messages and consult your hosting provider's support documentation.
Security Best Practices
Use strong passwords: Protect your domain registrar and hosting accounts with strong, unique passwords.
Enable two-factor authentication: Add an extra layer of security to your accounts.
Regularly update your server: Keep your Minecraft server software up to date to protect against security vulnerabilities.
Monitor your domain: Use domain monitoring services to alert you if your domain goes down.
Backup your configurations: Keep backups of your DNS settings and server configurations.
Consider using a DDoS protection service if you're hosting a popular server to prevent attacks.
🤝 Contributors
PokeDB: Developed and designed the website
Alino10: Provided creative ideas and invaluable support
📊 Domain Setup Effort Breakdown
This chart illustrates the estimated effort required for each step in setting up a custom domain for your Minecraft server, highlighting the differences between manual and automatic setup methods.
📊 Setup Method Comparison
This chart compares the different domain setup methods based on cost, control, and ease of use to help you choose the best option for your Minecraft server.